
Distal Radius Fracture
What the break is, when surgery is needed, and the rehab timeline from week one through week twelve.
Call 520-881-1394 Read the exercisesWho this is for
This page is for people with a broken wrist — a distal radius fracture, often from a fall on an outstretched hand.
Olivia Sobojinski, PA, and Gabby Ventura, PA listen first and talk through whether the bone is displaced and what treatment fits. There isn't one path that fits everyone.
What happens at your visit
You will usually have an X-ray in the office. We look at it together and talk about whether the fracture is displaced or not, and what that means for treatment.
Understanding the break
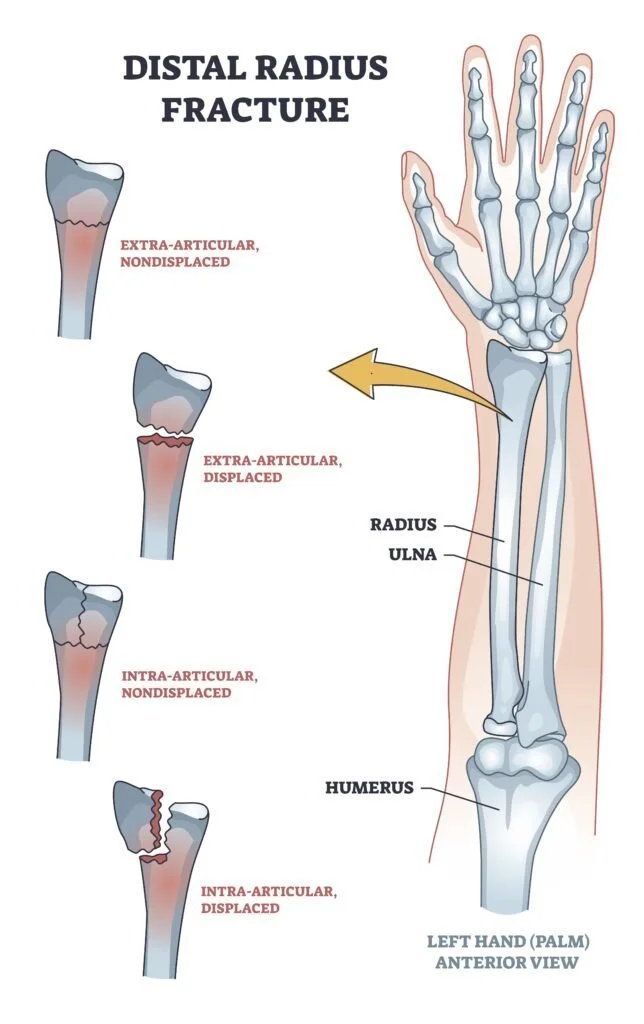
The radius bone is one of two bones that are in the forearm. The radius is on the thumb side of the forearm and turns around the ulna as you rotate your arm. It is the bigger of the two bones at the wrist and smaller of the two bones at the elbow.
When falling onto an outstretched hand it takes the majority of the pressure therefore is more prone to fracture.
The radius can break either through the joint (intra-articular) or outside the joint (extra-articular). Treatment depends on the displacement of the bone. If it is not displaced then surgery is not necessary and can be watched closely with X-rays every two weeks to make sure the bone is not displacing. If the fracture is displaced then it is generally recommended that surgery is performed to reduce the fracture and fixate it with plates and screws.
Bone takes roughly 6 weeks of healing time. Most people will experience pain for the first four weeks and then it starts to improve. At the six week mark is when you will transition out of the brace and begin working on getting the stiffness out. Unfortunately this will result in soreness from the tendons and capsule stretching. Most people are feeling good and have most range of motion back by the 10th week.
Treatment
Treatment depends on the displacement of the bone.
Not displaced
If it is not displaced then surgery is not necessary and can be watched closely with X-rays every two weeks to make sure the bone is not displacing.
Displaced
If the fracture is displaced then it is generally recommended that surgery is performed to reduce the fracture and fixate it with plates and screws.
The timeline
Bone takes roughly 6 weeks of healing time. At the six week mark you transition out of the brace and begin working on getting the stiffness out. Most people are feeling good and have most range of motion back by the 10th week.
Healing phase: Week 1–6
Control pain and swelling, allow soft tissue to heal, and start moving the fingers while the bone heals.
Goals
- Control pain and swelling
- Allow soft tissue to heal
- Start moving fingers
Clinic appointments
Meet with Dr. Ward at 2 weeks, 4 weeks, and at 6 weeks to get x-rays to confirm no further displacement of fracture.
If there is concern for displacement, you may see Dr. Ward more often.
Wound care
If you had surgery, at two weeks your surgical dressing will be removed and you will be placed in a removable splint.
You may shower but do not submerge the incision under water (in a pool or hot tub) for 4 weeks.
You may remove the steri-strips at 3 weeks post op or when they begin to peel or fall off.
Splint care
Leave splint on at all times. You may remove it to shower or to wash your hands.
You may begin to use your fingers when it is tolerable but leave the brace on. You may write, type, eat or other gentle activities if you can tolerate it. Moving your fingers will help decrease swelling and aid in your rehab.
Driving
You may begin driving once you feel strong enough to grip the steering without pain.
Continue to use your brace while you drive.
Never drive while taking pain medications.
Precautions
- No lifting greater than 5 lbs
- No climbing ladder or step stool
- Do not remove your brace
Exercises
During the healing phase exercises are limited using your fingers for gentle activities.
You may walk and do other lower body exercises but it is recommended to avoid higher intensity aerobic activity for the first 3–4 weeks.
While lower body exercising is ok, keeping your hand lowered in a dependent position during these activities will increase swelling to the hand and may increase pain.
Modalities
Ice is great to help decrease pain and swelling. Keep on the wrist for 30 minutes then remove for 20 minutes. Perform this every other hour while awake for week 1–2 then reduce to 3 times per day or as needed for pain and swelling.
You may remove the brace for ice therapy as long as you are keeping it on a flat surface. Always keep a layer of clothing between the ice and your skin.
Pain treatment
Week 1–2: Stay ahead of pain by taking medication on a scheduled basis. Ibuprofen and Tylenol is usually sufficient but a few narcotic pills may be prescribed if needed.
Week 3–4: Back off of narcotic medications, but continue to take Ibuprofen medication and Tylenol on a regular schedule.
Week 4+: Continue Tylenol and Ibuprofen as needed but generally should not need it as often. Continue ice treatment if pain continues.
Motion phase
Meet at 6 weeks to obtain x-rays and remove the brace. The bone should be healed, but the tendons and ligaments will still be tight.
Splint care
You may remove the splint during the day while you are home or in a controlled environment. The splint is still worn at night and in uncontrolled environments (at work or out of the house) for an additional 2–3 weeks.
As you improve your range of motion and soreness decreases, you may use your splint less and less until you are no longer using it.
Exercises
Begin with gentle wrist motions that you use in your everyday life (combing your hair, brushing your teeth, eating).
Begin passive range of motion exercises with the opposite hand to assist. Mobilize your fingers by playing with a stress ball or small object in your hand throughout the day.
Activity
You may start increasing your activity as you are able to tolerate. At first, continue with the 5 lb restriction without the brace, then increase as tolerated.
While the bone should be healed at this point, the tendons and ligaments will be tight. Increasing activity too quickly could sprain the ligaments, resulting in pain and setting your rehab back.
Ice and heat
Continue with ice on an as-needed basis. It is expected that your wrist will be sore as you increase your activity, and ice may help decrease soreness and pain.
Use heat before your stretches to relax and soften the tissue, then use ice after your stretches to decrease swelling and pain.
Pain treatment
Continue taking Tylenol and ibuprofen as needed. It is expected that you will have a slight increase in soreness as you increase your activity. Ibuprofen will help with soreness and tightness.
Clinic appointments
Meet with Dr. Ward at 6 weeks from injury to obtain x-rays and to remove the brace. Meet with Dr. Ward at 10 weeks for final x-rays and to confirm that you are progressing with range of motion.
If you have a more severe injury or there are concerns, you may meet with Dr. Ward more often.
Strengthening: Week 10–12
Continue stretching until the wrist matches the other side, then add light resistance. No impact activity.
Goals
- Regain full range of motion of the wrist, equal to the other wrist
- Regain functional strength
- Return to full occupational requirements
Exercises
Continue wrist stretching exercises until full range of motion and equal to the other wrist has been achieved.
May begin resistance training with light weights and resistance bands. May do resisted wrist flexion and extension exercises.
Precautions
No impact activity.
Clinic appointments
Meet with Dr. Ward at 10 weeks for final x-rays and final evaluation.
You may meet with Dr. Ward further if there are concerns or you are not progressing as expected.
Pain treatment
Continue taking anti-inflammatory medications at night and after exercises as needed.
Narcotics should no longer be required at this phase.
Exercises: Week 1–6
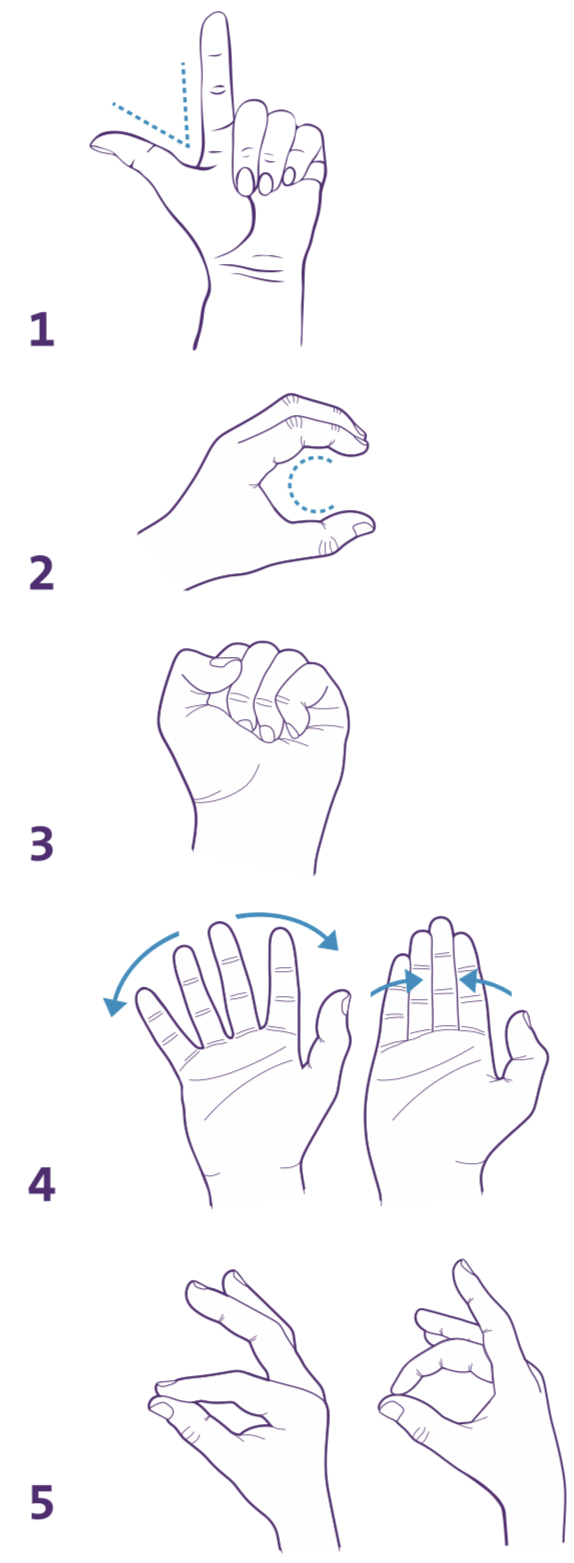
Fingers only while the bone heals. Hold 2 seconds, repeat 10 times, 3 times per day.
Finger sequence
Holding your injured hand out in front of you:
- Make a V with your index finger and thumb
- Bend your knuckles to make a C
- Gently make a fist
- Splay your fingers out and back in
- Touch each finger to your thumb
Hold 2 seconds. Repeat 10 times, 3 times per day.
Exercises: Week 7–9
Continue the finger sequence. Add these wrist stretches plus the gentle daily-life motions from the motion phase: combing your hair, brushing your teeth, eating, and a stress ball for the fingers. Hold stretches 30 seconds unless noted.
Passive stretch
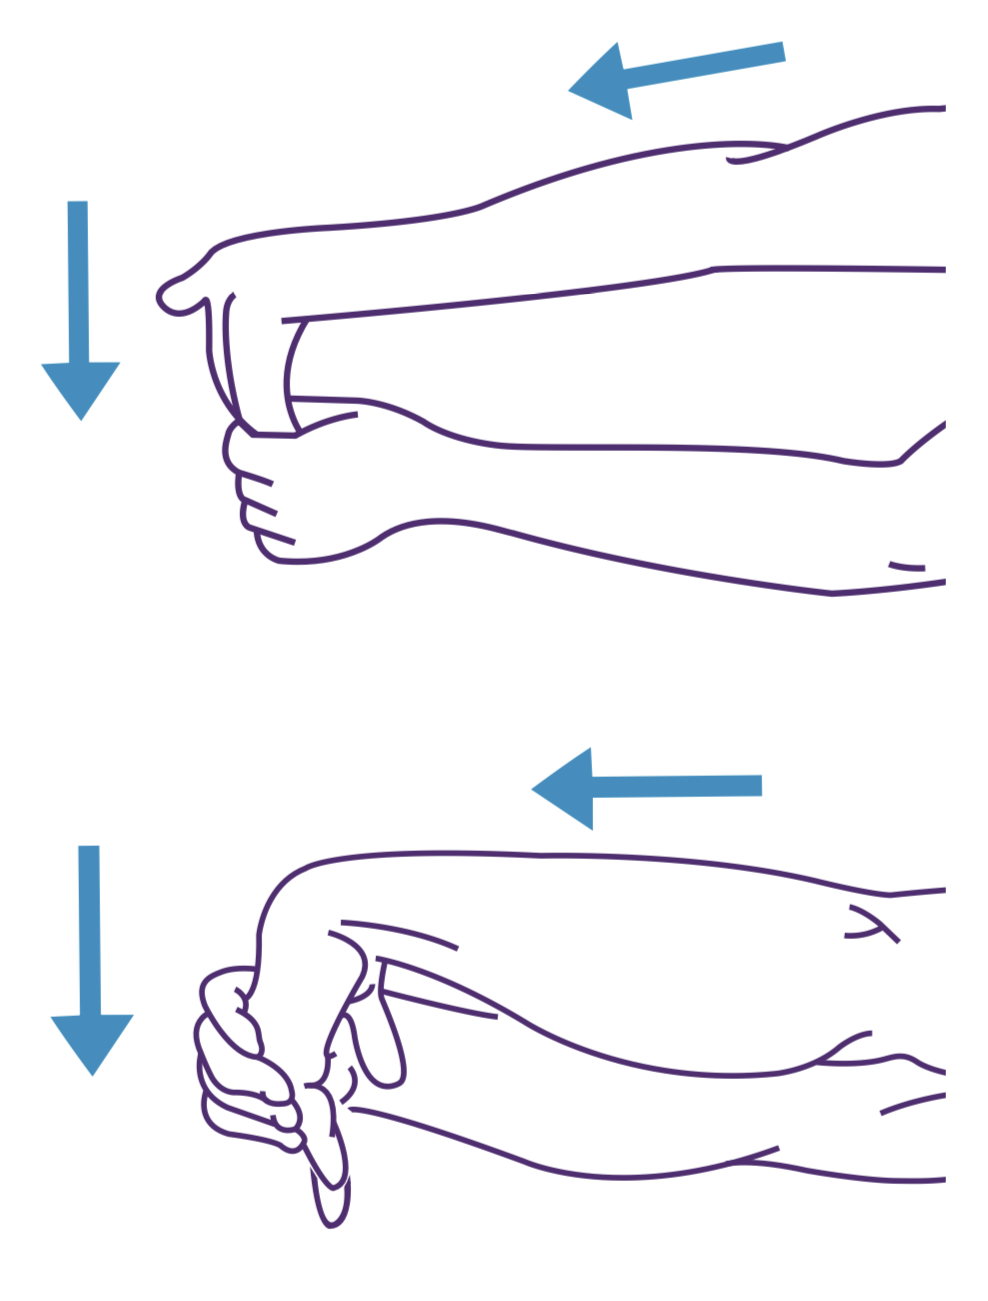
While standing or sitting, hold your arms out, keeping your elbows straight. With your opposite hand, pull your fingers back with your palm facing up. Next, with palm facing down, pull fingers in toward the wrist.
Hold 30 seconds. Repeat 3 times, 3 times per day.
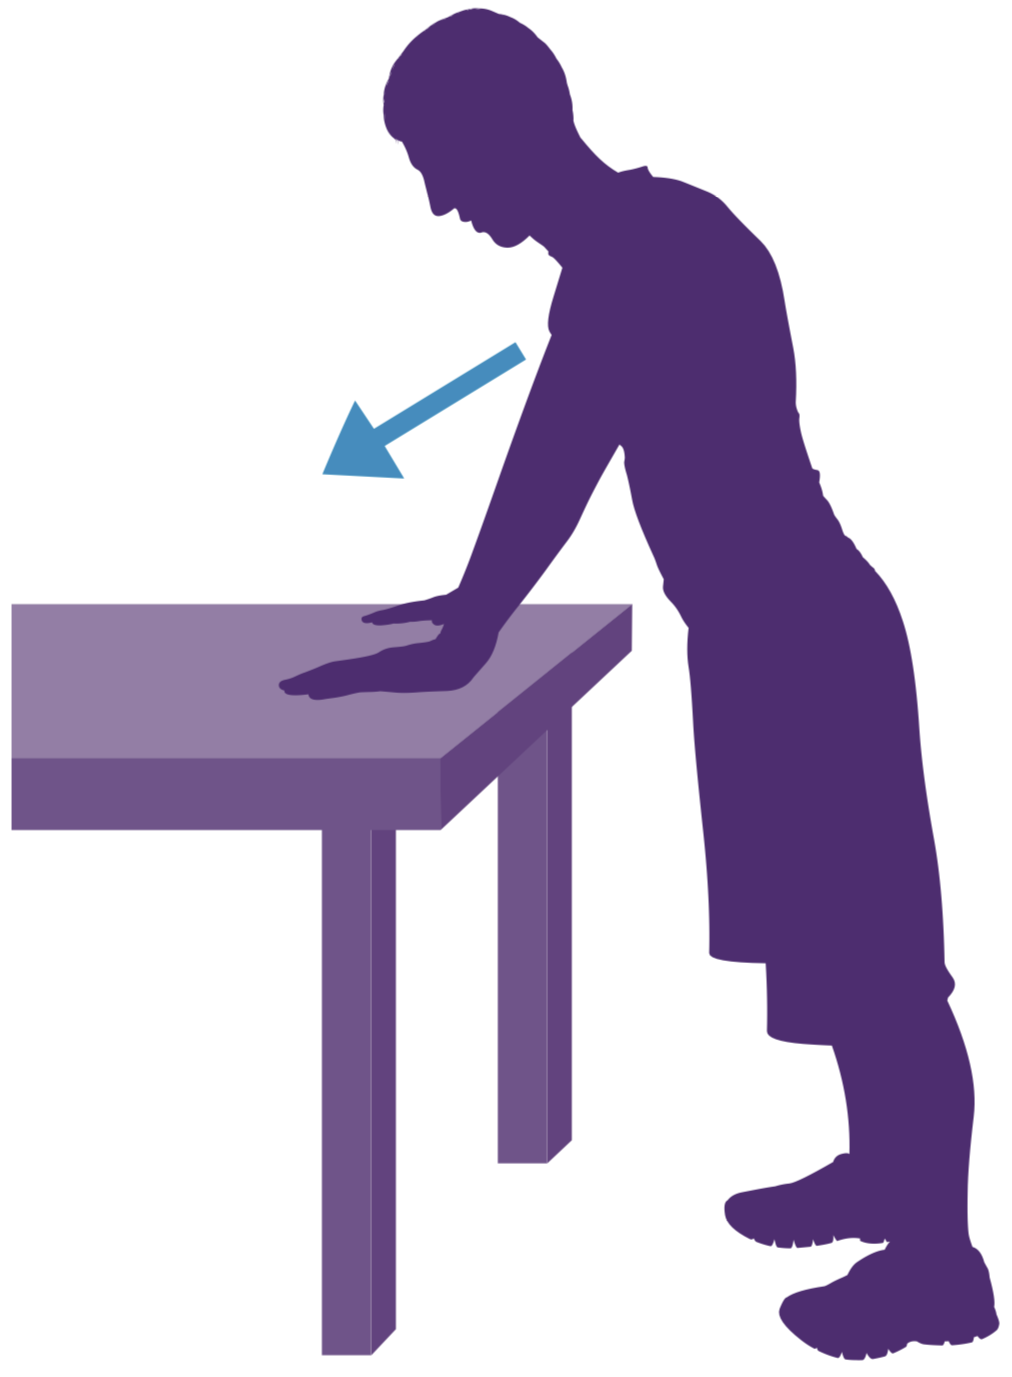
Table stretch
While standing with your hands flat on the table and your elbows locked straight, lean forward, using your weight to feel the stretch. Next, put the backs of your hands on the table so your palms face toward the wrist and lean forward.
Hold 30 seconds. Repeat 3 times, 3 times per day.
Supination and pronation
While sitting, hold your affected arm at your side and bend your elbow to 90 degrees. Rotate palm up, thumb up, then palm down. Hold each 2 seconds.
Repeat 10 times for 3 sets, 3 times per day.
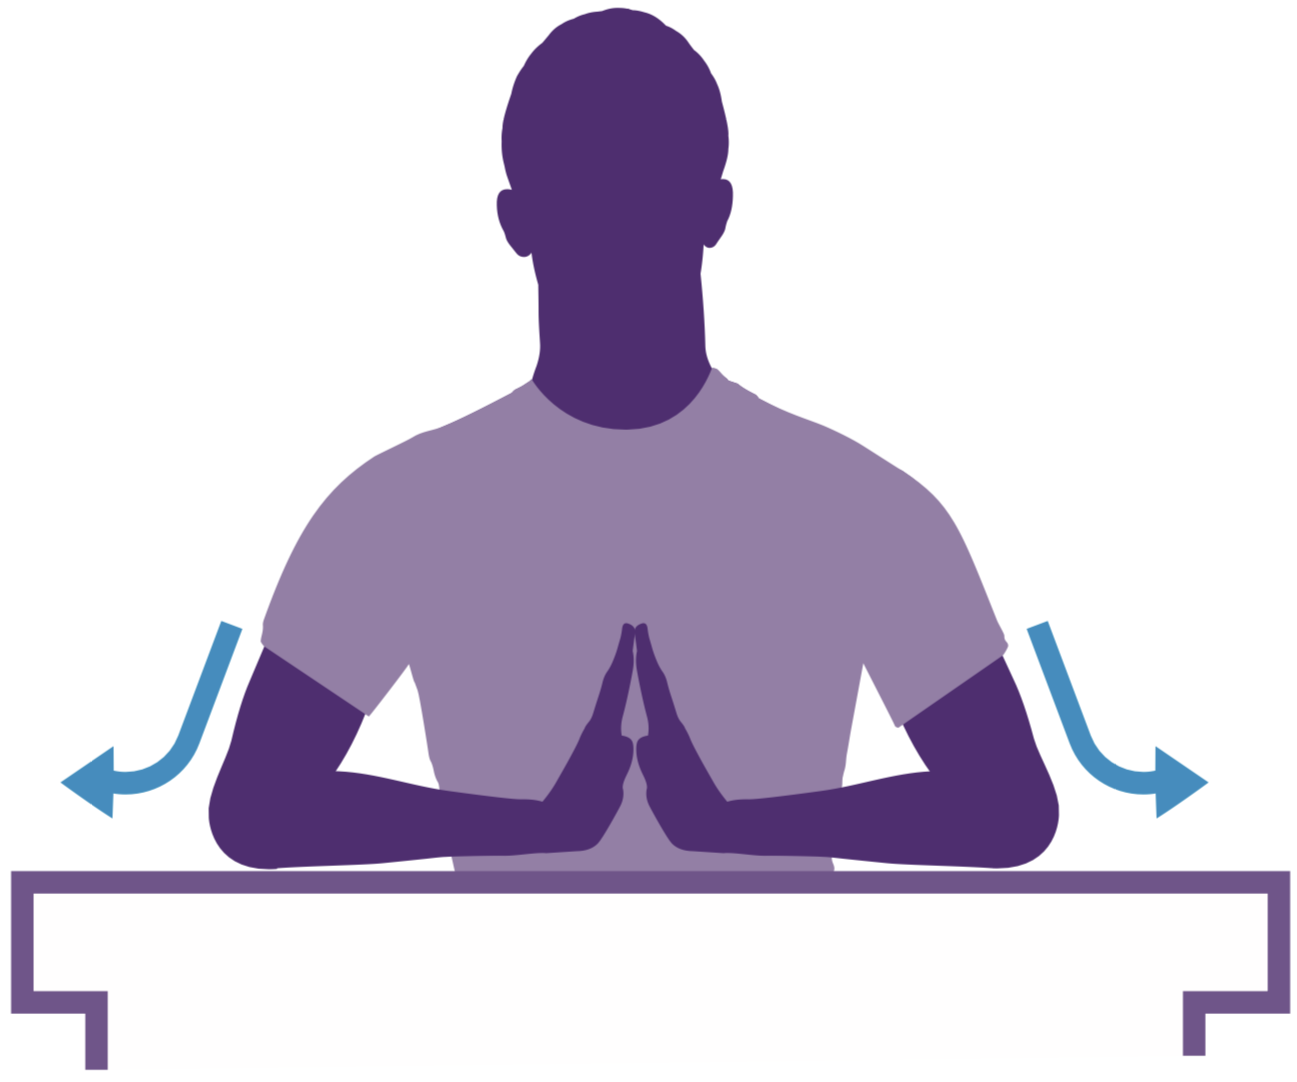
Prayer stretch
With your hands together like you are praying, push your elbows down onto a table and slide them apart, bringing your hands and wrists down to the table.
Hold 30 seconds. Repeat 3 times, 3 times per day.
Exercises: Week 10–12
Continue the earlier exercises. Add light resistance. No impact activity.
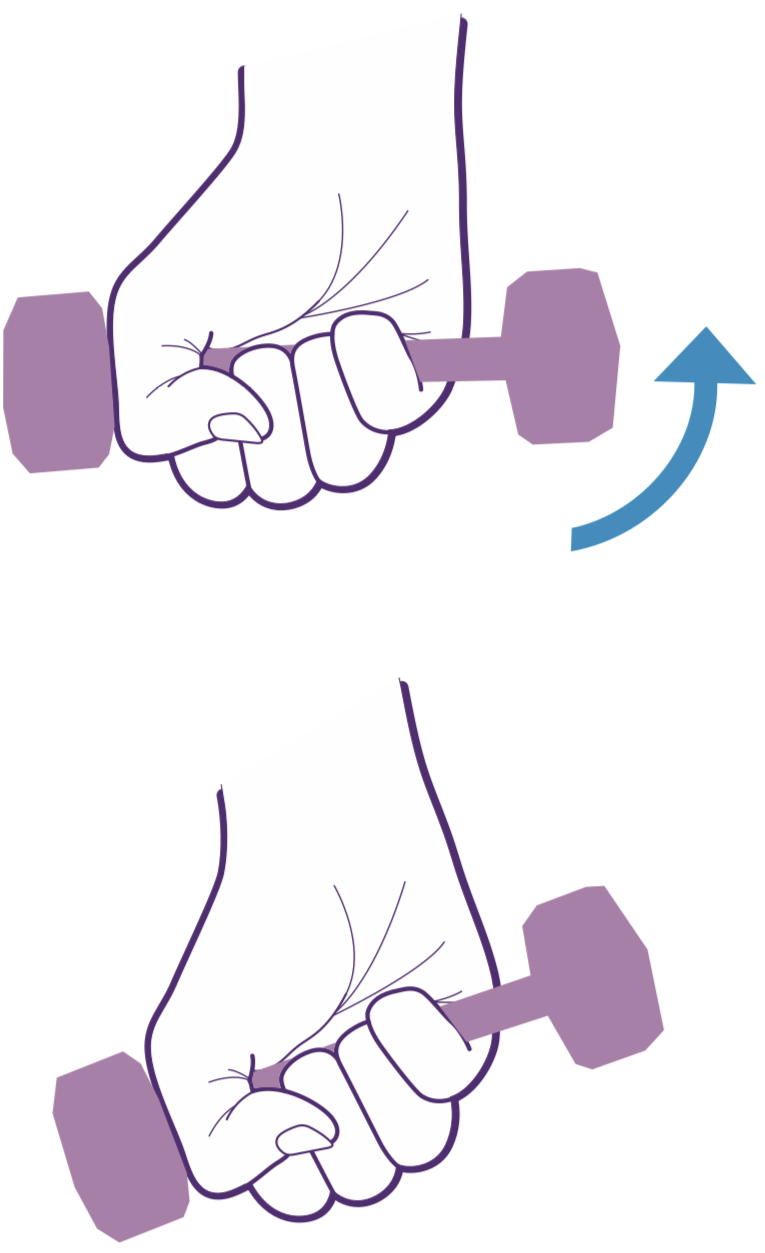
Eccentric wrist flexion
Sit or stand with your forearm supported. Holding a light weight, support the back of your wrist with the opposite hand, bend your palm up toward you, then slowly lower to the start position without support from the other hand. Use an empty or full can, resistance band, or a light dumbbell.
Repeat 10 times for 3 sets, 3 times per day.
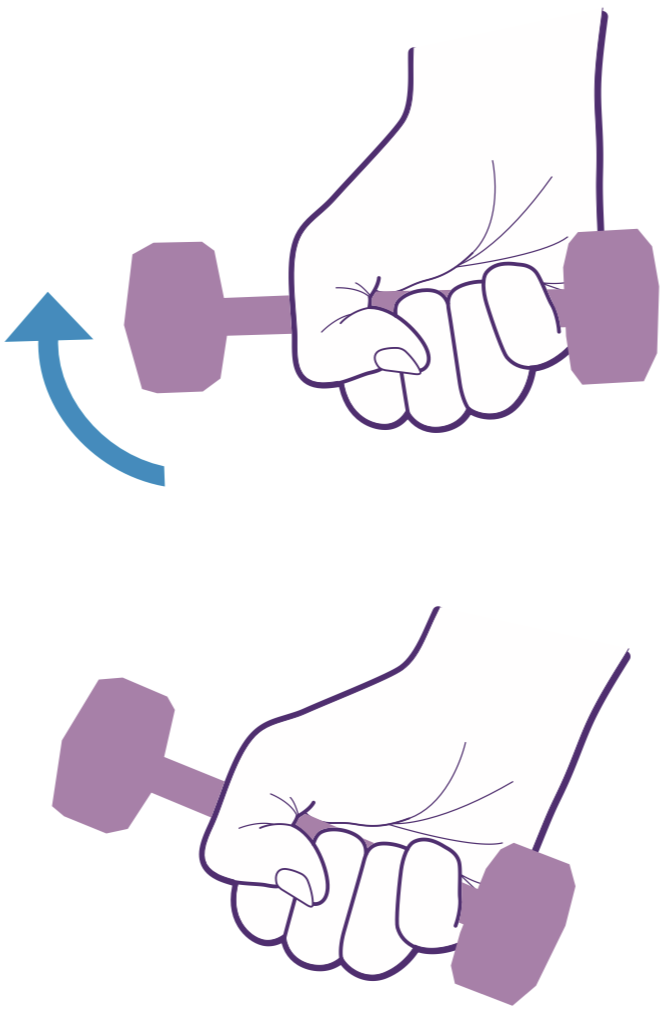
Eccentric wrist extension
Sit with your forearm supported or stand. Using a light weight, support your palm with the opposite hand, bend the back of your wrist up toward you, then slowly lower to the start position without support from the other hand. Use an empty or full can, resistance band, or a light dumbbell.
Repeat 10 times for 3 sets, 3 times per day.
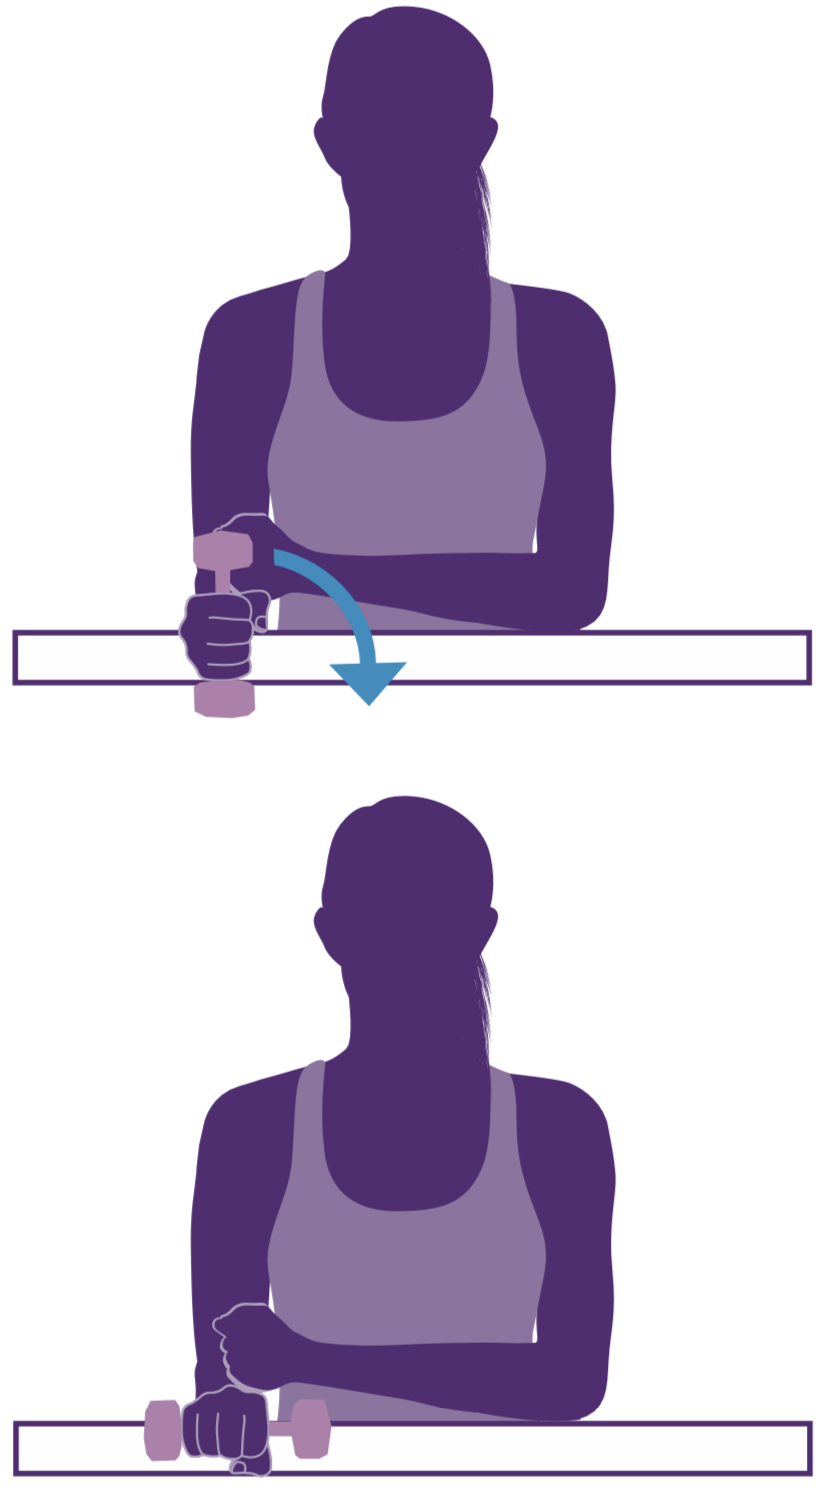
Wrist ulnar deviation
Sit or stand with a light hammer or dumbbell and your arm straight at your side. Slowly bend the pinky side of your wrist up behind you. Hold for 2 seconds and slowly lower back to starting position.
Repeat 10 times for 3 sets, 3 times per day.
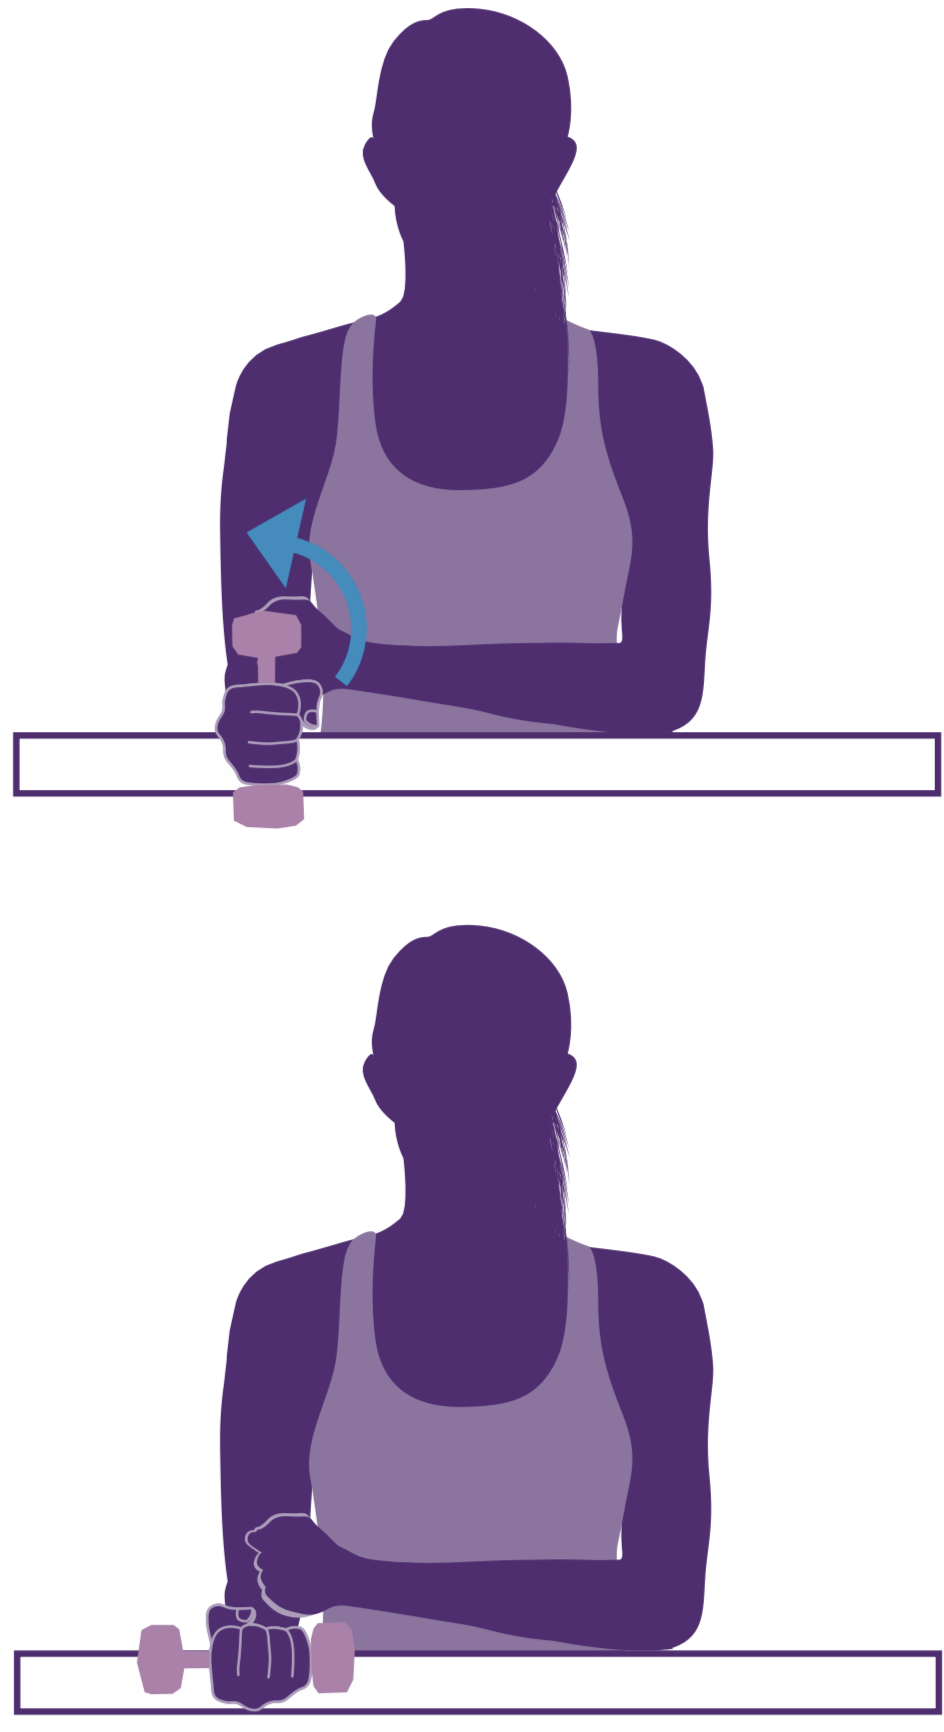
Wrist radial deviation
Stand or sit with a light hammer or dumbbell and your arm straight at your side. Slowly raise the thumb side of your wrist up in front of you. Hold for 2 seconds and slowly lower back to starting position.
Repeat 10 times for 3 sets, 3 times per day.
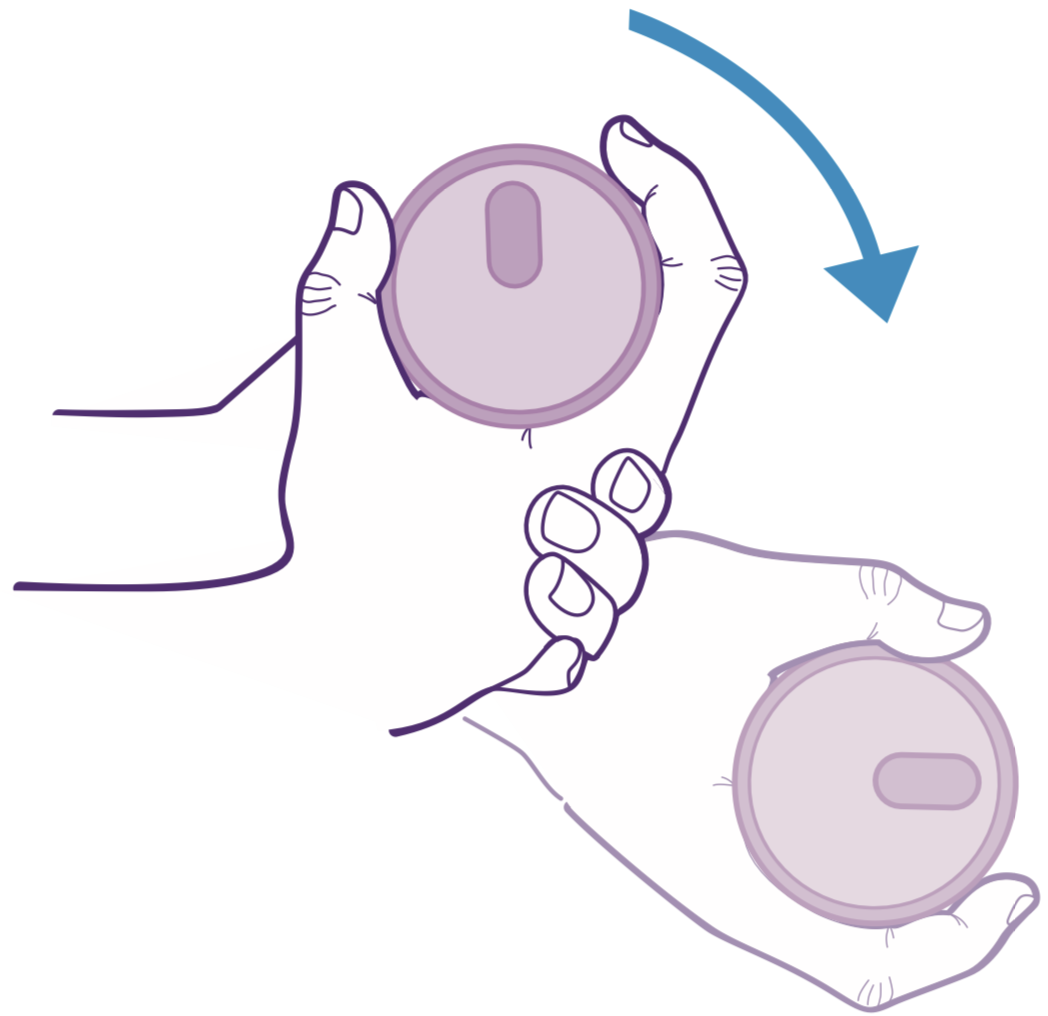
Weighted pronation
Sit with your forearm supported on a table, your hand over the edge, and your palm facing up toward the ceiling. Holding a hammer or light dumbbell, start in a thumb-up position and turn your palm down. Hold for 2 seconds.
Repeat 10 times for 3 sets, 3 times per day.
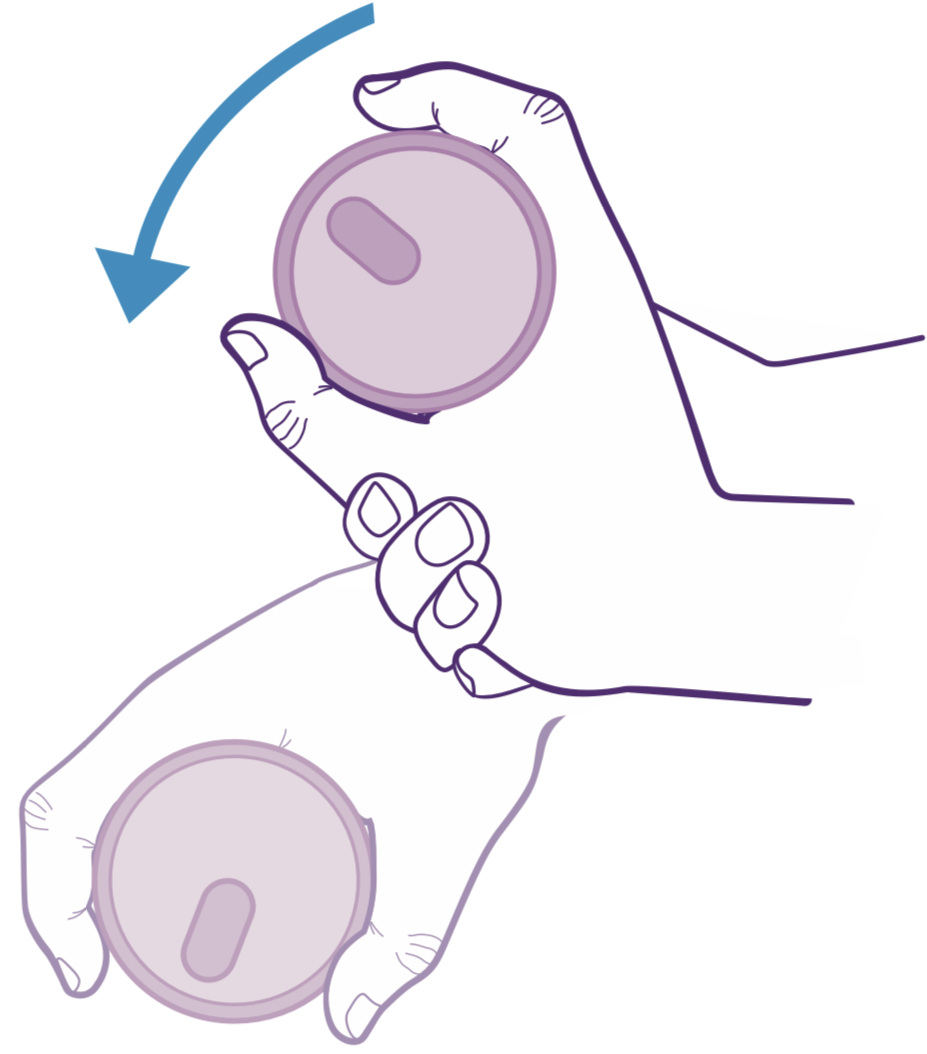
Weighted supination
Sit with your forearm supported on a table, your hand over the edge, and your palm facing up toward the ceiling. Holding a hammer or light dumbbell, start in a thumb-up position and turn your palm up. Hold for 2 seconds.
Repeat 10 times for 3 sets, 3 times per day.
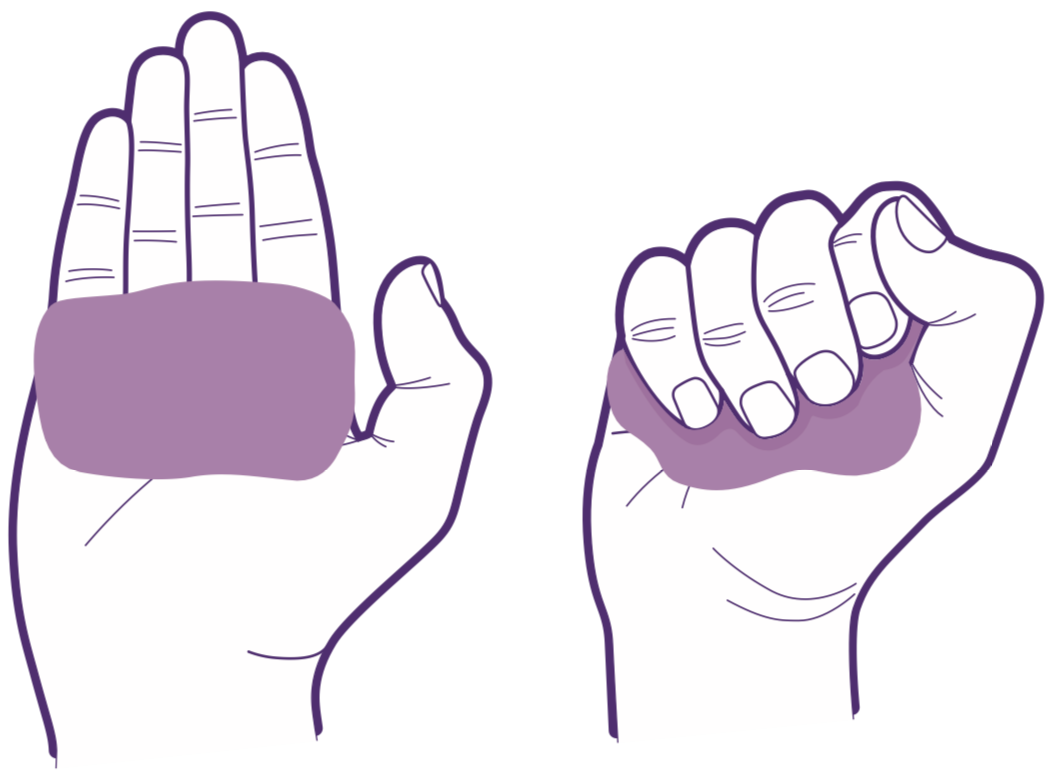
Putty squeeze
Hold a wad of putty, modeling clay, or a stress ball. Squeeze as hard as you can. Hold 5 seconds.
Repeat 10 times, 3 times a day.
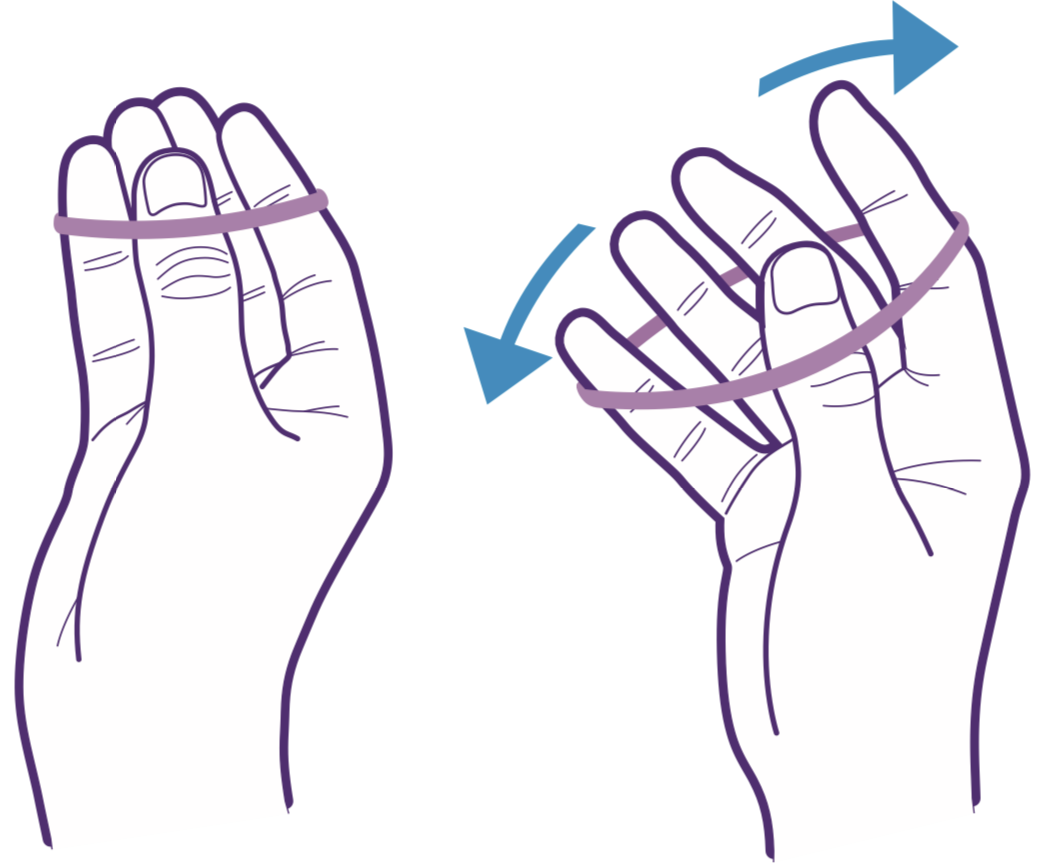
Rubber band
Place a large rubber band around the outside of your thumb and fingers. Open your fingers to stretch the rubber band.
Repeat 10 times for 3 sets, 3 times per day.
Schedule a visit
Call 520-881-1394 and we will find a time that works.
Call 520-881-13941521 E. Tangerine Rd, Suite 337
Oro Valley, AZ 85755 · (520) 901-6380
6130 N. La Cholla Blvd, Suite 135A
Tucson, AZ 85741 · (520) 881-1394